Crispy Buttermilk Chicken and Waffles with Spiced Hot Honey Drizzle
The hard part of Chicken and Waffles is never the cooking. It is the timing, because fried chicken goes soft in ten minutes and a waffle goes limp in five.
I solved it by holding both on wire racks in a low oven, which lets you fry and iron at your own pace.

Why You Will Love This Recipe
- A twelve hour buttermilk brine seasons the chicken all the way through and tenderises it, so the meat is as good as the crust rather than an afterthought.
- Splashing buttermilk into the dredging flour creates shaggy craggy clumps that fry into the irregular crunchy shards that make fried chicken worth eating.
- Cornstarch in the waffle batter produces a genuinely crisp exterior that holds up under hot chicken and honey instead of collapsing into a soggy base.
- The spiced hot honey takes four minutes and gives you the sweet and heat contrast that the whole dish is built on.
- Both components hold on wire racks in a low oven, which means everything arrives at the table hot and crisp at the same moment.
Ingredients
For the buttermilk brine
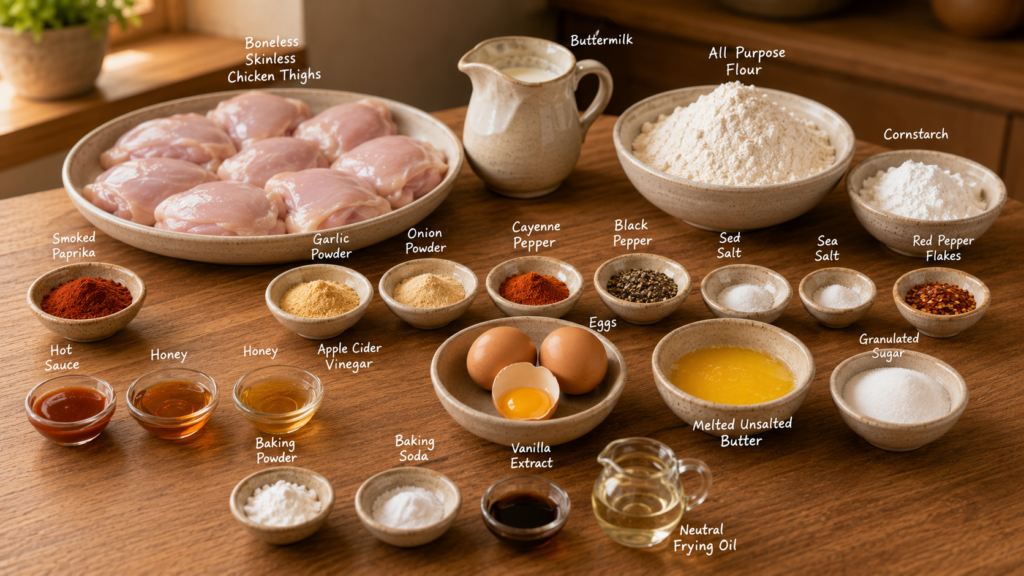
- 8 boneless skinless chicken thighs, roughly 2 pounds
- 2 cups buttermilk
- 1 tablespoon fine sea salt
- 1 tablespoon hot sauce
- 1 teaspoon garlic powder
- 1 teaspoon freshly cracked black pepper
For the seasoned dredge
- 2 cups all purpose flour
- 1/4 cup cornstarch
- 2 teaspoons fine sea salt
- 2 teaspoons smoked paprika
- 1 and 1/2 teaspoons garlic powder
- 1 teaspoon onion powder
- 1 teaspoon freshly cracked black pepper
- 1/2 teaspoon cayenne pepper
- 3 tablespoons buttermilk, reserved from the brine, for creating craggy clumps
For frying
- 6 cups neutral oil such as peanut or canola, for deep frying
For the crisp buttermilk waffles
- 1 and 3/4 cups all purpose flour
- 1/4 cup cornstarch
- 2 tablespoons granulated sugar
- 2 teaspoons baking powder
- 1/2 teaspoon baking soda
- 3/4 teaspoon fine sea salt
- 2 cups buttermilk, at room temperature
- 2 large eggs, at room temperature
- 6 tablespoons unsalted butter, melted and cooled
- 1 teaspoon pure vanilla extract
For the spiced hot honey
- 1/2 cup honey
- 1 tablespoon apple cider vinegar
- 1 teaspoon red pepper flakes
- 1/2 teaspoon smoked paprika
- 1/4 teaspoon fine sea salt
Crockery and Time To Create
You will need a large bowl or zip bag for the brine, a wide shallow dish for the dredge, a heavy cast iron Dutch oven, a clip on frying thermometer, a spider strainer or tongs, two wire cooling racks set over rimmed baking sheets, a large mixing bowl, a medium mixing bowl, a whisk, a rubber spatula, a small saucepan, and a matte black square waffle iron.
Prep time is 25 minutes. Brining time is 8 to 12 hours. Cook time is 40 minutes. Total time is 9 hours 5 minutes at the shortest. This makes 8 pieces of chicken and 8 waffle squares, which serves 4 people at 2 pieces and 2 squares each.
Ingredient Substitutions and Variations
- Bone in chicken thighs: Swap the boneless thighs for bone in, adding 4 to 5 minutes to the fry time and checking for 175F at the bone.
- Chicken breast: Swap in breast cut into 4 ounce cutlets when you prefer white meat, reducing the fry time to about 5 minutes total.
- Homemade buttermilk: Swap the buttermilk for whole milk mixed with 1 tablespoon lemon juice per cup, rested 10 minutes until visibly curdled.
- Maple syrup: Swap the honey in the drizzle for pure maple syrup for a rounder sweetness that leans less floral against the spice.
- Cornmeal: Swap 1/4 cup of the dredge flour for fine cornmeal to add a sandy grit and extra crunch to the crust.
- Chipotle powder: Swap the cayenne for chipotle powder when you want smoke rather than sharp heat in the coating.
- Belgian waffle iron: Swap the standard iron for a deep pocket Belgian model, adding roughly 90 seconds to each waffle and expecting a softer interior.
Step-by-Step Instructions
Brine the Chicken Overnight
- Whisk the buttermilk, salt, hot sauce, garlic powder, and black pepper together, then submerge the chicken thighs completely.
- Refrigerate for 8 to 12 hours, turning the container once if any pieces sit above the liquid.
- Do not push past 24 hours. The acid in buttermilk continues working on the protein and the texture eventually turns soft and mealy rather than tender.
Mix the Dredge and Make It Craggy
- Whisk the flour, cornstarch, salt, smoked paprika, garlic powder, onion powder, black pepper, and cayenne together in a wide shallow dish.
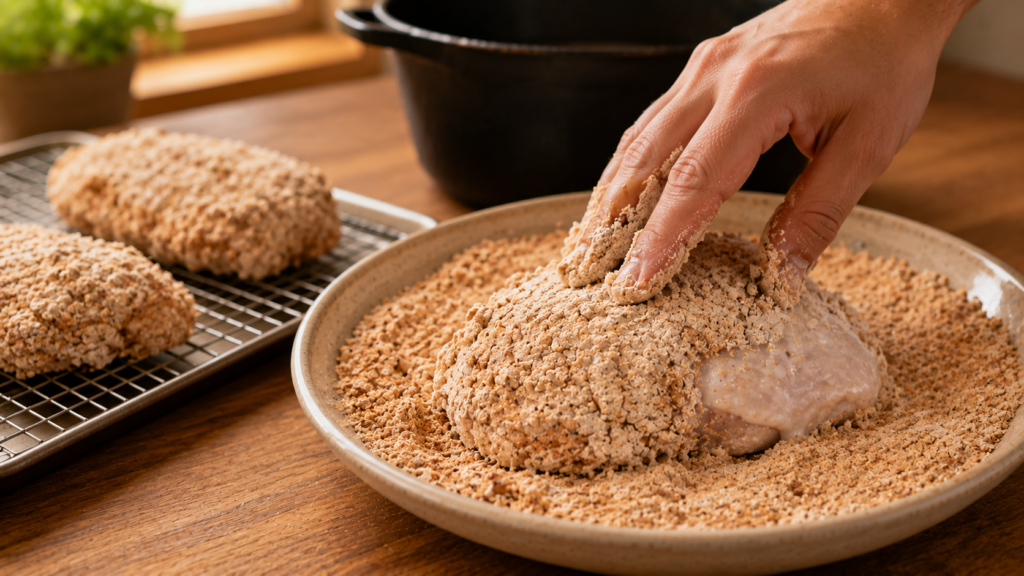
- Drizzle the 3 tablespoons of reserved buttermilk across the surface and rake it through with your fingertips for about 30 seconds.
- You are looking for small shaggy clumps roughly the size of peas scattered through the dry flour. Those clumps are what fry into the irregular crunchy shards that separate good fried chicken from a smooth uniform crust.
Dredge the Chicken Firmly
- Lift each thigh from the brine, let the excess drip off for a couple of seconds, and press it firmly into the seasoned flour.
- Turn it, press again, and scoop loose flour over the top, pushing down so the craggy clumps adhere across the whole surface.
- Set each dredged piece on a wire rack and leave them for 10 minutes. This rest lets the coating hydrate and glue itself to the meat so it does not slide off in the oil.
Heat the Oil and Hold It Steady
- Pour the oil into the Dutch oven to a depth of about 2 inches and bring it to 350F, clipping a thermometer to the side.
- Preheat the oven to 200F and set both wire racks over rimmed sheets, one for chicken and one for waffles.
- Oil temperature is the single most important variable here. Below 325F the crust absorbs oil and turns greasy, and above 375F it browns before the inside cooks.
Fry in Two Batches
- Lower 4 pieces into the oil and fry for 6 to 8 minutes, turning once at the halfway point.
- The chicken is ready when the crust is a deep even golden brown, the bubbling around the pieces has slowed noticeably, and the thickest part registers 165F.
- Lift onto the wire rack and slide it into the 200F oven. Let the oil come back to 350F before starting the second batch, which usually takes about 3 minutes.
Whisk the Waffle Batter
- Whisk the flour, cornstarch, sugar, baking powder, baking soda, and salt in a large bowl.
- Whisk the buttermilk, eggs, cooled melted butter, and vanilla in a medium bowl, then pour into the dry and fold for no more than 12 strokes.
- Leave the batter lumpy with visible streaks of flour. Overmixing develops gluten and gives you a chewy waffle rather than a crisp light one.
Cook the Waffles and Check the Steam
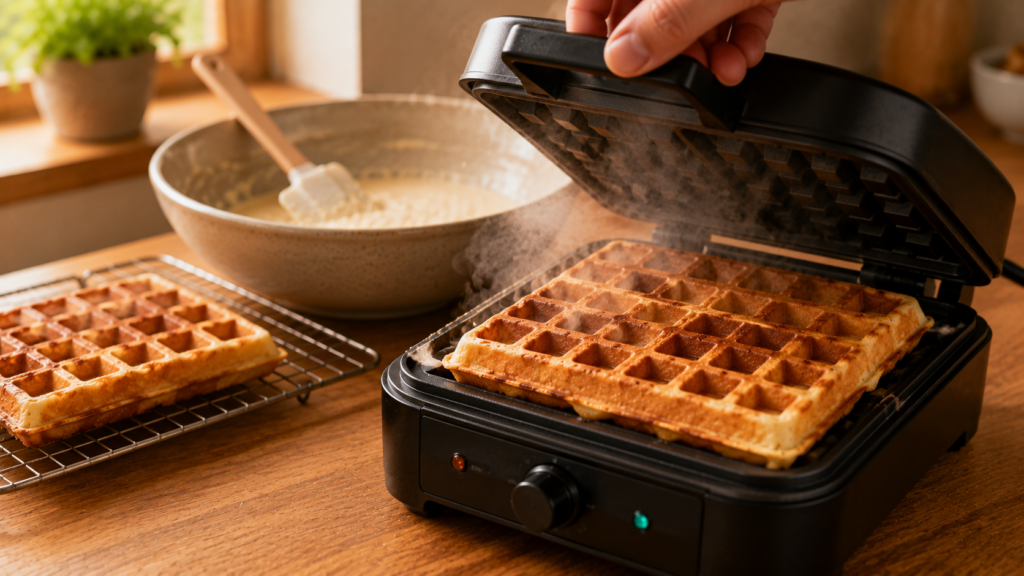
- Heat the waffle iron fully, brush it lightly with melted butter, and pour in enough batter to cover about three quarters of the grid.
- Close the lid and cook for 4 to 5 minutes without opening it. Watch the steam escaping from the seam, and when it drops from a heavy plume to a thin wisp the waffle is done.
- Lift the lid to reveal a deep golden brown grid with crisp raised edges and a pale creamy golden interior. Move each waffle straight to the second wire rack in the oven, never stacked on a plate.
Simmer the Spiced Hot Honey
- Warm the honey, apple cider vinegar, red pepper flakes, smoked paprika, and salt in a small saucepan over low heat for 4 minutes.
- Let it come to a bare simmer and no further, stirring occasionally, until the flakes have softened and the honey has thinned enough to pour freely.
- Take it off the heat and let it sit for 5 minutes so the heat from the flakes has time to bloom into the honey.
Assemble and Serve Immediately
- Set two waffle squares on each plate and lay two pieces of fried chicken across them.
- Spoon the warm spiced honey generously over the chicken so it runs down into the waffle grid.
- Serve straight away, since the whole point of the wire rack method is that everything arrives crisp.
Pro Tips for Best Results
- Use a thermometer for both the oil and the chicken rather than judging by colour, because a dark crust and a cooked interior are not the same thing.
- Never rest fried chicken or waffles on a plate or a paper towel, since trapped steam softens the underside within a minute. Wire racks are not optional here.
- Reserve the brine buttermilk before discarding the rest, as those three tablespoons in the dredge are what create the craggy texture.
- Fry in two batches even if everything seems to fit, because crowding the pot drops the oil temperature sharply and the crust turns greasy.
- Resist opening the waffle iron early to check, since splitting a waffle before it sets ruins both the structure and the crisp exterior.
Common Mistakes to Avoid
- Brining longer than 24 hours: The buttermilk acid breaks the protein down too far and the texture turns soft and mealy. Stay in the 8 to 12 hour window.
- Skipping the ten minute rest after dredging: The coating has not bonded yet and large sheets of it will slide off in the oil. Let it sit.
- Frying at the wrong temperature: Too low and the crust drinks oil, too high and it browns over raw meat. Hold 350F and let it recover between batches.
- Stacking waffles on a plate: They steam themselves soft in under a minute. Single layer on a wire rack in a low oven every time.
- Overmixing the waffle batter: A smooth batter makes a tough chewy waffle. Fold to just combined and leave the lumps.
- Boiling the hot honey: A real simmer scorches the honey and turns it bitter. Keep it at the barest bubble for four minutes.
What to Serve With
- Quick pickled cucumbers: Thin slices in vinegar and sugar for twenty minutes give you the sharp acidic bite that cuts through fried chicken better than anything else on the table.
- Buttermilk coleslaw: The cold crunch and creamy tang provide temperature and texture contrast against hot crisp chicken and soft waffle.
- Cold sweet tea: The traditional pairing across the American South, and the cold sweetness sits naturally against the spiced honey heat.
Storage and Reheating
- Fridge: Store chicken and waffles in separate airtight containers for up to 3 days, keeping the hot honey in a small jar at room temperature.
- Freezer: Freeze cooled waffles in a single layer then bag them for up to 2 months. Fried chicken freezes for 1 month but loses noticeable crust quality.
- Reheating the chicken: Warm on a wire rack at 400F for 10 to 12 minutes, which drives moisture out of the crust and brings the crunch back properly.
- Reheating the waffles: Toast directly from the fridge or freezer on a medium setting, which crisps them better than an oven does.
- Avoid the microwave: It turns fried crust soggy and waffles rubbery within seconds, and neither recovers.
Nutrition Information
| Nutrient | Per Serving |
|---|---|
| Calories | 964 kcal |
| Total Fat | 44 g |
| Saturated Fat | 16 g |
| Cholesterol | 268 mg |
| Sodium | 1,486 mg |
| Total Carbohydrate | 94 g |
| Dietary Fiber | 3 g |
| Total Sugars | 41 g |
| Protein | 61 g |
| Calcium | 368 mg |
| Iron | 6 mg |
| Nutrition values are estimates calculated per serving of 2 pieces of chicken and 2 waffle squares with honey, and will vary based on oil absorption, portion size, and exact ingredients used. | |
Health Benefits
Chicken thighs carry meaningfully more iron and zinc than breast meat along with sixty one grams of protein per serving here, which is enough to make this a genuinely satiating meal rather than one that leaves you hungry an hour later.
Buttermilk contributes calcium and a small amount of live cultures, and its acidity in the brine does real work tenderising the meat without any added fat. Serving this with pickled vegetables or a vinegar based slaw adds fiber and acidity that help balance a rich fried plate.
Conclusion
This is a weekend project and I am not going to pretend otherwise, but almost all of it happens the night before. Brine early, keep the oil at 350F, and put everything on wire racks rather than plates. Make it for people you actually want to feed, and save the recipe if the crust stays crunchy all the way to the table.